How to export phone numbers from a Motorola phone to your Google account
I was upgrading from a Motorola Z3 RIZR to a HTC Magic / G2 (aka T-Mobile myTouch 3G with Google ::rolls eyes::) which required me to get the phone numbers off the old phone and into my Google account. So instead of manually typing my numbers into Google contacts, which is for suckers, I automated the process. This is how I did it.
P2KTools Info First you need an utility to connect your phone to your computer. The first one I tried which worked well out of the box was
P2KTools. I'm sure there are other utilities that work equally as well. P2K is the name of Motorola's file system, so a lot of the utilities will refer to this. P2KTools is free, the website is in Russian, however there is an english translation for the program itself which makes it very usable. Get the program and the Motorola USB driver from
P2KTools' website. I used version 3.0.9 build 961 and Motorola Handset USB Driver v.3.7.0 for Windows (32-bit) OS. First install the Motorola USB driver and then extract P2KTools.
Before you launch P2KTools, edit the following lines in config.ini to make it a bit more usable (i.e. readable, unless you speak russian):
- Config.ini Changes
[General]
Lang=english.lng
Skin=office2007.skn
;...
[P2K_Mode]
OtherFeaturesFile=other_features_en.pof
;...
[AT_Mode]
BaudRate=57600
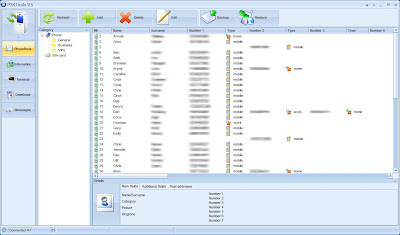
Now you may launch the utility. Click the big cellphone button at the top left and select AT Mode. Go to the phonebook section if you're not there already. The status at the bottom left should say connected and the model number of your phone. Click the refresh button to download your phonebook. You should see something like the picture to the right:
Now to export the phonebook click the Backup button at the top. Select Save only phone memory: Old MPT format (without extended fields). Save the phonebook as default.csv file (my perl script defaults to that file name). Make sure it is saving as .csv not .pt3, if not you may need to switch to another export format and then switch back, which is a small bug in the program.
Conversion to Google Format After the export you should have default.csv file with the following format:
- P2KTools Phonebook Output Format
CATEGORY;1;General;255;255
PHONE;1;MeganFox;5555551234;3;0;255;0;1;2;255;255;0;VERSION2;;;;;;;;
PHONE;2;KristenBell;5555553421;3;0;255;0;1;1;255;255;0;VERSION2;;;;;;;;
PHONE;3;KariByron;5555554312;1;0;255;0;1;1;255;255;0;VERSION2;;;;;;;;
Which isn't exactly what I would call comma separated values (.csv)
Now we must convert this to a format that your Google account can import. To do this automatically I wrote
this perl script whose source can be expanded below:
- processContacts.pl Source
#!perl
#
# processContacts.pl - Converts P2KTools phonebook export format to google
#     account import format.
#
# Usage: processContacts.pl [inputfile.csv] [outputfile.csv]
#
# Author Eric Hoffman
#
# Limitations:
#     -Only recognizes Mobile, Home, and Work phone types (the rest need to be added)
#     -First and Last name are split on second capitalized letter (so weird
#          capitilization in first names can cause the second part to be in the
#          last name field)
#     -Ignores contact groups
#     -Input format is fixed to the following format:
#          CATEGORY;1;General;255;255
#          PHONE;1;MeganFox;5555551234;3;0;255;0;1;2;255;255;0;VERSION2;;;;;;;;
#          ...
#     -Output format is fixed to the following format:
#          Name,Given Name,Family Name,Phone 1 - Value,Phone 1 - Type
#          Megan Fox,Megan,Fox,5555551234,Mobile
#          ...
###############################################################################
use warnings;
use strict;
use Text::CSV_XS;

#default file names
my $inputFile = "default.csv";
my $outputFile = "output_default.csv";

#process input args
my $help = 0;
if($#ARGV == 0 || $#ARGV == 1) {
    $inputFile = $ARGV[0];
    if($#ARGV == 0) {
        $outputFile = "output_".$ARGV[0];
    }
    else {
        $outputFile = $ARGV[1];
    }
}
elsif($#ARGV > 1) {
        $help = 1;
}

#check and open input file
print "\nAttempting to open $inputFile for processing, outputting to $outputFile ... ";
my @contactsLines;
if(!open(CONTACTSIN, "<$inputFile")) {
    print "Failed!\n    Can't open $inputFile: $!\n\n";
    $help=1;
}
else {
    print "OK\n\n";
    @contactsLines = <CONTACTSIN>;
}
close CONTACTSIN;

#print help
if($help) {
    print "Usage: processContacts.pl [inputfile.csv] [outputfile.csv]\n";
    exit 1;
}

#open output file --Will overwrite existing file name!--
open(CONTACTSOUT, ">$outputFile") or die "Can't open $outputFile: $!";
#print column names for google import
print CONTACTSOUT "Name,Given Name,Family Name,Phone 1 - Value,Phone 1 - Type\n";

my $csv = Text::CSV_XS->new ({sep_char => ';'}); #semicolon seperated .scsv?
my $name;
my $givenName;
my $familyName;
my $phone;
my $phoneType; #0 -> work, 1 -> home      , 3 -> mobile   Unknown: fax, pager, other,
my @typeReplace = ("Work", "Home", "Other", "Mobile", "Other", "Other", "Other", "Other", "Other");

#Walk through lines in contacts file, putting into $_
for(@contactsLines) {
    my $curLine = $_;
    if($csv->parse($curLine)) {
        my @field = $csv->fields;
        if($#field >= 14) { # first name     last name            distinguished by captalization only
            if($field[2] =~ /([\w\~\*\-\.]+)([A-Z][\w\~\*\-\.\ ]*)/) {
                $name = "$1 $2";
                $givenName = $1;
                $familyName = $2;
            }
            else { #only first name found in contact
                $name = $field[2];
                $givenName = $field[2];
            }
            $phone = $field[3];
            $phoneType = $typeReplace[$field[4]];

            #output to screen and file
            print "    Name \"$name\", first \"$givenName\", last \"$familyName\", phone \"$phone\", phoneType \"$phoneType\"\n";
            print CONTACTSOUT "$name,$givenName,$familyName,$phone,$phoneType\n";
            $familyName = "";
        }
    }
    else { #parsing failure
        $csv->error_diag();
        die "parse() failed on argument: ", $csv->error_input;
    }
}

close CONTACTSOUT;
Put the perl script in the same directory as the default.csv file. Run the perl script, you'll need
Active Perl if you're on Windows. You can just double click the script to run it if you've used the expected input file name. The script has a few limitations, the main ones being: first and Last name are split on the second capitalized letter regardlessly, contact groups are ignored, and the input format is fixed at the above format.
Now we have a true .csv file which your Google account can understand. Which should look like:
- Perl Script Output Format for Google Import
Name,Given Name,Family Name,Phone 1 - Value,Phone 1 - Type
Megan Fox,Megan,Fox,5555551234,Mobile
Kristen Bell,Kristen,Bell,5555553421,Mobile
Kari Byron,Kari,Byron,5555554312,Home
Importing to Google
Open up Gmail Contacts and click Import at the top right, select output_default.csv. Its best to add these new contacts to a new group so its easier to manage them at first, so add to a new group called Phone. Now with the contacts imported Gmail makes it very easy to merge any contacts with multiple phone numbers into one contact by highlighting multiple entries and clicking merge these contacts. Also you can merge your phone contacts with the contacts you already had in Google. Finally setup your contact groups as you like. If you complete all of this before setting up your new Android phone, when you turn it on for the first time all your contacts will be downloaded to your phone automatically!
Hope this was helpful and happy Googling.


